Battles
Basics
Here you'll get the basic information on how to attack, support and to defend yourself.
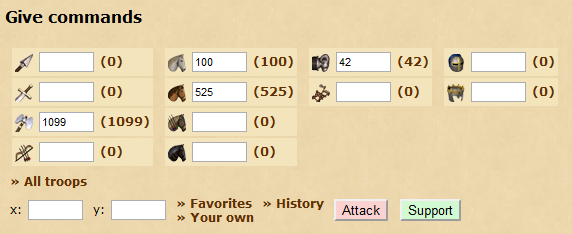
Rally point

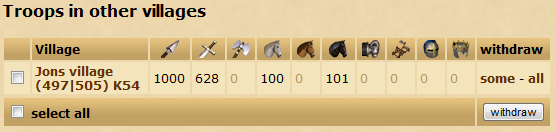
The rally point is the central meeting point of your troops and the place you use to control them. Under "commands" you can send out your troops or cancel commands during the first few minutes after sending (usually 10 minutes, but this varies according to world settings). When you click on "troops" you see all the units that are stationed in other villages or that have been send to this village from other villages.
Attacking
Once you've built a few units and want to attack an opponent, just go to the map and click on the village that you want to attack. There you select "send troops". It's important that you don't forget that every village has a base defense and that the opponent might have units as well. All units have different properties, which make some units better for attacking and others better for defending. You can find details about the units' skills in the Unit overview.
Defending
If you are attacked regularly, the attacker probably wants either your resources or he wants to noble your village. If there is no nobleman included in the attack, the attacker is probably just trying to plunder your resources. There are a few things you can do to protect yourself:
- Contact your tribe for help
- Keep the stored resources low by using all the resources right away
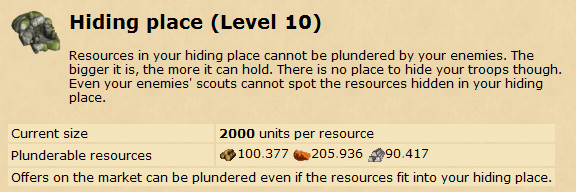
- Build up your hiding place and wall.
All units have different properties, which make some units better for attacking and others better for defending. You can find details about the units' skills in the Unit overview.
In the beginning the paladin is a very good unit to protect yourself against the first attacks and it becomes even more valuable when other players send their paladins as support.
Supporting
Sometimes another member of your tribe or a friend needs your help. You can send resources to other players, but you can also send troops as support to help defend other players against enemies. To do this go to your rally point and enter the target coordinates, then add the number of troops you want to send. Now click on "support" and confirm with "OK" and your troops will begin their journey.
When you send your paladin as part of your supporting army, all your troops move at the same speed as the paladin.
When your supporting troops are attacked in another player's village you will receive a report telling you how many troops you have lost. You do not see who attacked, or how many units were attacking. When your troops have finished defending a village you can withdraw them. To withdraw your troops enter your rally point and click "troops". There you can withdraw some or all of your troops.
Speed
You can see the speed of the units in the Unit overview. When you send several units together, they will march at the speed of the slowest unit. Troops will march home after an attack at the same speed as their outward journey.
An exception to this is the paladin. When you send out support troops that include your paladin, all troops that march with him will move at his speed.
Your troops always march the direct way. They also march diagonal over villages, lakes and mountains without a change to their speed.
The wall

The wall greatly increases the defense of the village. It affects both the base defense and the defending troops.
The wall is very effective to protect yourself from plunderers, especially in the early stages of the game. Later in the game a fully constructed wall is the backbone of every defensive army.
Scouting

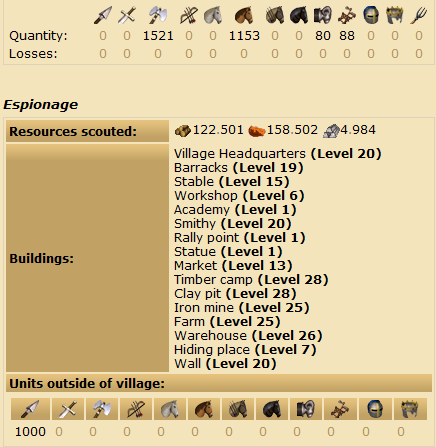
With scouts you can get information about your enemies' villages. To spy on the village all you have to do is attack with your scouts, just like you would with any other unit.
The only way to defeat scouts that are attacking your village is to have scouts present in your village - these will then defend against the incoming scouts. The scouts defending your village may cause losses among the attacking scouts, but you will not lose any of your own units to attacking scouts.
On all worlds the result of the scout attack depends on the amount of the surviving scouts.
- If at least one scout survives: You can see the units currently stationed at the village.
- If at least 50% of the scouts survive: You can also see the village's resources.
- If at least 70% of the scouts survive: You can also see the construction levels of the village's buildings.
- If more than 90% of the scouts survive: You can also see troops belonging to the village that are currently away from the village.
However, there are some further restrictions and requirements that differ per world.
- Sometimes world settings do not permit scouts to spy on units outside villages. If this is the case, the only way to see units outside enemy villages is to use Kalid's telescope.
- If the 3 level research system is enabled:
- Level 1 scouts must be researched in order to see resources in the village.
- Level 2 scouts must be researched in order to see buildings in the village.
- Level 3 scouts must be researched in order to see troops belonging to the village that are currently not stationed there.
- Please note that some scout settings require a minimum of 4 scouts to be sent in order for all of them to survive, even if a village is undefended. This setting is often used in combination with the Simple research system.
Paladin

If the paladin is activated in your world, you can recruit one paladin from your statue. You can also rename your paladin if you want to. If the paladin dies a new one can be recruited.
The paladin is a good supplement to your looting troops at the beginning of the game. He reduces your losses and can also carry quite a few resources. He can also assist your defense. He is most effective when a lot of your friends or tribe members send their troops and their paladins to one player. This way even very large armies can be defeated.
The paladin also plays an important role later in the game, since he increases the speed of your defensive troops. Every support troop that you send with your paladin marches as fast as he does. For example, sword fighters walk more than twice as fast as they would without him. As soon as you have built several statues, you can also let your paladin move between your villages.
The weapon chamber

The weapon chamber holds items that you can equip your paladin with. Your paladin finds new items when it collects experience. The paladin always collects experience, however, it will collect experience much faster when you send it out to attack and fight against defended villages.
In order to equip your paladin with an item, just click on the item in the weapons chamber. Once your paladin has equipped himself, he will be displayed in the statue, where you can find a description of the selected item.
The items that you have found are well-protected in the weapons chamber. They can't be stolen by other players and if your paladin ever dies, the new paladin can equip himself again.
Paladin weapons are not enabled on all worlds.
Advanced
Tribal Wars' fighting system has a few special features like morale. Before you seriously start to attack it is recommended that you read that part of the help.
Morale
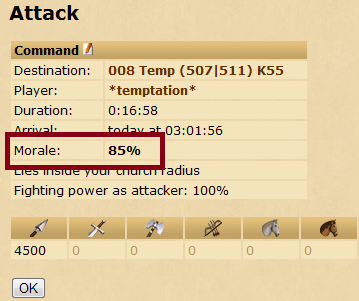
Morale is a protection for new players. It gets calculated from the points of attacker and defender. A player usually attacks with 100% morale, but if you attack a player that is much smaller than you, you will get a penalty. When morale is 45% your troops will only attack at 45% of their usual attack strength. If a smaller player attacks a much bigger player, there is no bonus on the attack. The maximum morale is 100%.
Time can also play a factor in morale calculation. By that it uses the time since the player joined the world. If a small player has been playing a world for a long time but still has a small amount of points, morale will continuously rise until it reaches 50%.
You can find a morale calculator in the simulator. Just add your target's points and your own points to get the morale. Not all worlds use morale, and morale settings can vary from world to world.
Basic defense
Every village has a base defense. This means that every village defends itself, even if no troops are in the village. This means that very small attack forces, like 1 or 2 spear fighters, will die even without defending troops. The base defense is increased by building up the wall.
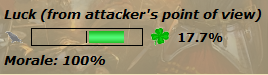
Luck
Luck is a completely random component of every fight. Your Luck will be somewhere between -25% and +25% and it is always given from the attackers point of view. If you are attacking with +25% luck it means that your fighting power is increased by 25%.
Barbarian villages
You can recognise abandoned villages as they are named "barbarian villages". There is no difference between villages owned by players and abandoned and barbarian villages. The moral for empty villages is always 100%. You can take over empty villages just like any other. Although barbarian villages have no owner, they will grow to a certain size if the world settings allow.
When players are deleted due to an infraction or due to them deleting their account, their villages turn into barbarian villages. Sometimes units are placed in barbarian villages that formerly belonged to an infracted player.
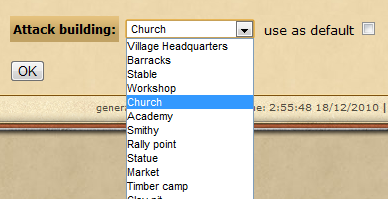
Catapults
Catapults can destroy your opponent's buildings. If you initiate an attack with catapults, you can select which building is targeted in the window from which you launch the attack. Using the "catapult target building level" in the simulator, you can simulate how many catapults you will need to partially or completely destroy a building at level X. It doesn't matter which building you're attacking; only the level is decisive, with the exception of the church. This means that in order to destroy an academy at level 1, you need just as many catapults as you do to destroy a smithy at level 1.
The following buildings can not be demolished below level 1: Village headquarters, Farm, Warehouse.
The hiding place cannot be attacked with Catapults.
Simulator

The Simulator lets you get an idea of the outcome of a fight. To use the simulator, enter your own units and the target's units, the wall and the morale. You can select the item that you want each paladin to carry in battle from a corresponding list. It is also possible to select several items if there are several paladins with various items in the defending village. You just have to take a good guess about how the opponent has equipped his paladin. You should also set whether the units have religious belief, since only troops with this belief have 100% fighting power. If you don't know whether the village lies within the corresponding belief radius, you will need to guess.
You can also change the luck, e.g. to test what happens with -25% luck as the "worst case" scenario. This is relevant if you want to know whether you will win regardless of how lucky (or unlucky) you may be.
Once you have set the options, the simulator calculates the outcome of the battle.
Sleep mode
Sleep mode is only used in Speed worlds. If sleep mode is activated your account will periodically be put to sleep, meaning that any attacks on your village will turn into visits and no battle will take place.
You can adjust your preferred sleep times within the limitations of the round settings by going into "Settings" and choosing the "Sleep mode" option.
Night bonus
If enabled on the world, the night bonus is usually active between midnight and 8am. This can vary from world to world and while the night bonus is active, the defender receives a bonus of 100% when attacked. The bonus does not affect scouts or when you attack a barbarian village.
If night bonus was active for an attack it will be indicated in the battle report.
Note that a new, variable version of the night bonus is being used on tribalwars.net from world 114 onward! For more information on this please refer to our announcement here
First church
Note: Churches are only enabled on some worlds.
You begin with a church in your first village. This church is a special kind of church. It influences a bigger area, but it's size can't be extended.
If you lose the village with the first church, you can rebuild that special church in any other village. You are able to build this church in any village for a much lower price than other churches as long as you don't already have a church in the villages.
The First Church can not be destroyed with catapults.
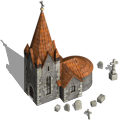
Church
Note: Churches are only enabled on some worlds.
The church is the religious gathering place for the surrounding villages. Without a church the troops of this village and the villages influenced by the church fight with only half their usual strength. Every one of your villages should be influenced by a church. Each village may only have one church. If your world has churches enabled, your first village begins with a First church.
In contrast to the first church, this church can be attacked with catapults. However, it is a lot more resistant to catapult attacks than other buildings at the same level.
As soon as you have multiple villages it is possible to build additional churches. It is a very expensive building that needs a lot of farm space so it is not wise to build a church in every village. The higher the building level, the bigger an area the church influences.
Church Belief Radius:
- Level 1: 4 fields in every direction
- Level 2: 6 fields in every direction
- Level 3: 8 fields in every direction
In the village overview you can see if your village is influenced by a church and how many churches support this village. On the map you have the option to show the influence area of the church. The blue circle shows its range.
- The church is destroyed when the village is taken over.
- A village only needs one church for its fighters to fight with full force. Additional churches do not raise the fighting power any further.
- Fighters only get strengthened by your own churches. Churches of allies or tribe members do not help your troops.
- If you are supporting another player, the troops are strengthened by the other player's churches.
- When attacking, the village from which the attack is launched is looked at. If this village is influenced by a church, the troops fight with full strength. It doesn't matter if the village under attack is influenced by a church or not.
Conquering villages
Taking over another player's village
Nobling means taking over another village. It is the only way to get a second village. To noble a village you first need a nobleman and attack the target with it. In a successful attack the nobleman reduces the village's loyalty. The base loyalty of a village is 100 and every attack lowers the loyalty by 20-35, even if you send more than one nobleman in that attack. To take over the village the loyalty needs to taken down to 0 or lower. This usually takes 4 or 5 attacks, in rare cases it can also be done with 3 attacks.
A nobleman attacking alone usually dies on the base defense of a village so you should always send troops with it.
As soon as the nobleman has lowered the loyalty to 0 or less, it takes over the reign of the village and cannot be used for another attack.
Loyalty
The loyalty of a village shows how close the village is to switching owners. It is usually at 100, in which case it isn't displayed. But as soon as there is an attack with a nobleman, the loyalty is lowered by 20-35 with every attack. The loyalty usually rises by 1 point per hour, but this is dependent on world settings and the speed of the world. For example, on a speed 2 world the loyalty will rise by 2 points per hour.
As soon as the loyalty falls below 0, the village is taken over by the attacker and loyalty is increased to 25.
Being conquered by another player
Losing your village is of course very annoying, but it is no reason to quit. You receive a new village on the outside of the map and you will be surrounded by other players that have new villages. You will therefore have a good chance to grow on this world. On worlds that have been going on a while longer already, the beginning villages are already developed a bit further.
Ask your tribe for help and let them send you resources or support troops so that you can rebuild quickly.
Recruiting noblemen
To create a nobleman, you first have to fulfill the building requirements. This means you have to have your headquarters at level 20, smithy at level 20 and market level at 10. You should have also enough resources and farm space.
The amount of noblemen that you can create depends on the amount of gold coins or packages you own. You can store these in your academy. Gold coins and packages are not used up or lost, even if you lose a nobleman or a village. They are stored globally and do not have to be transferred to other villages.